• This is default featured slide 1 title

    Go to Blogger edit html and find these sentences.Now replace these sentences with your own descriptions.This theme is Bloggerized by NewBloggerThemes.com.

  • This is default featured slide 2 title

    Go to Blogger edit html and find these sentences.Now replace these sentences with your own descriptions.This theme is Bloggerized by NewBloggerThemes.com.

  • This is default featured slide 3 title

    Go to Blogger edit html and find these sentences.Now replace these sentences with your own descriptions.This theme is Bloggerized by NewBloggerThemes.com.

  • This is default featured slide 4 title

    Go to Blogger edit html and find these sentences.Now replace these sentences with your own descriptions.This theme is Bloggerized by NewBloggerThemes.com.

  • This is default featured slide 5 title

    Go to Blogger edit html and find these sentences.Now replace these sentences with your own descriptions.This theme is Bloggerized by NewBloggerThemes.com.

Zipear archivos

Para zipear archivos desde java les traigo la siguiente clase:

/** 
* 
* @author jonathan-palomino.blogspot.com
*/ 
import java.util.logging.Level; 
import java.util.logging.Logger; 
import java.util.zip.*; 
import java.io.*; 
  
public class Zipear { 
    public static void Comprimir(String args[]) throws IOException{ 
              if (args.length < 2) { 
            System.err.println("use: Zip.zip file1 file2 file3"); 
            System.exit(-1); 
        } 
        File zipFile = new File(args[0]); 
        if (zipFile.exists()) { 
            System.err.println("Archivo Zip existente seleccione otro"); 
            System.exit(-2); 
        } 
        FileOutputStream fos = new FileOutputStream(zipFile); 
        ZipOutputStream zos = new ZipOutputStream(fos); 
        int bytesRead; 
        byte[] buffer = new byte[1024]; 
        CRC32 crc = new CRC32(); 
        for (int i=1, n=args.length; i < n; i++) { 
            String name = args[i]; 
            System.out.println("--------"+name); 
            File file = new File(name); 
            if (!file.exists()) { 
                System.err.println("Skipping: " + name); 
                continue; 
            } 
            BufferedInputStream bis = new BufferedInputStream( 
                new FileInputStream(file)); 
            crc.reset(); 
            while ((bytesRead = bis.read(buffer)) != -1) { 
                crc.update(buffer, 0, bytesRead); 
            } 
            bis.close(); 
            // Reset to beginning of input stream 
            bis = new BufferedInputStream( 
                new FileInputStream(file)); 
            ZipEntry entry = new ZipEntry(name); 
            entry.setMethod(ZipEntry.STORED); 
            entry.setCompressedSize(file.length()); 
            entry.setSize(file.length()); 
            entry.setCrc(crc.getValue()); 
            zos.putNextEntry(entry); 
            while ((bytesRead = bis.read(buffer)) != -1) { 
                zos.write(buffer, 0, bytesRead); 
            } 
            bis.close(); 
        } 
        zos.close(); 
    } 
    public static void main(String args[])  { 
        String argumentos[] = {"C:\\zip.zip","C:\\Test.pdf"}; 
        try { 
            Comprimir(argumentos); 
        } catch (IOException ex) { 
            Logger.getLogger(Zipear.class.getName()).log(Level.SEVERE, null, ex); 
        } 
    } 
}
Share:

Capturar pantalla

Si queremos por algún motivo obtener la captura de pantalla con java aquí les dejo el código:

import java.awt.Dimension; 
import java.awt.Rectangle; 
import java.awt.Robot; 
import java.awt.Toolkit; 
import java.awt.image.BufferedImage; 
import java.util.logging.Level; 
import java.util.logging.Logger; 
import javax.imageio.ImageIO; 
import java.io.File; 
/** 
* 
* @author jonathan-palomino.blogspot.com 
*/ 
public class Capturar_pantalla { 
    
    public static void main(String [] args){ 
        try { 
            captureScreen("C:\\archivo.png"); 
        } catch (Exception ex) { 
            Logger.getLogger(Capturar_pantalla.class.getName()).log(Level.SEVERE, null, ex); 
        } 
    } 
    public static void captureScreen(String fileName) throws Exception { 
  
   Dimension screenSize = Toolkit.getDefaultToolkit().getScreenSize(); 
   Rectangle screenRectangle = new Rectangle(screenSize); 
   Robot robot = new Robot(); 
   BufferedImage image = robot.createScreenCapture(screenRectangle); 
   ImageIO.write(image, "png", new File(fileName)); 
  
} 
}
y lo guardan en “archivo.png” o el que deseen para este caso deje el método como static pero no es necesario.
Share:

Generar PDF

El propósito de este post es generar un pdf sencillo mediante Java.

Nos vamos a la página http://sourceforge.net/projects/itext/files/ y descargamos iText. La importamos en nuestro proyecto yendo al menú Biblioteca—agregar archivo jar y seleccionamos los 2 jar.

El código

Se trata de una aplicación muy sencilla que escribirá en el pdf un párrafo con un saludo y otro con la fecha actual.

import com.itextpdf.text.Document;
import com.itextpdf.text.Paragraph;
import com.itextpdf.text.pdf.PdfWriter;
import java.io.File;
import java.io.FileOutputStream;
import java.io.OutputStream;
import java.util.Date;


public class GeneratePDF {

    public static void main(String[] args) {
        try {
            OutputStream file = new FileOutputStream(new File("C:\\Test.pdf"));

            Document document = new Document();
            PdfWriter.getInstance(document, file);
            document.open();
            document.add(new Paragraph("Hola a todos!"));
            document.add(new Paragraph(new Date().toString()));

            document.close();
            file.close();

        } catch (Exception e) {

            e.printStackTrace();
        }
    }
}

Share:

cambiar icono jframe


1)El ícono debe ser una imagen de extensión PNG. Esto se hace más fácil, ya que conseguir una figura y convertirlo en formato .ico es muy complicado. Los PNG nos ayudan bastante.
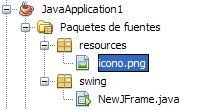
2)La imagen que será el ícono debe estar dentro del paquete de fuentes, como si fuera una clase más. Si estuviera dentro de un paquete, sería mucho mejor.


3)En el código del JFrame que vamos a poner el ícono, sobreescribimos el método getIconImage() conteniendo el siguiente código: (notar cómo se está llamando a la imagen .png)
public Image getIconImage() {
Image retValue = Toolkit.getDefaultToolkit().
getImage(ClassLoader.getSystemResource("resources/icono.png"));
return retValue;
}
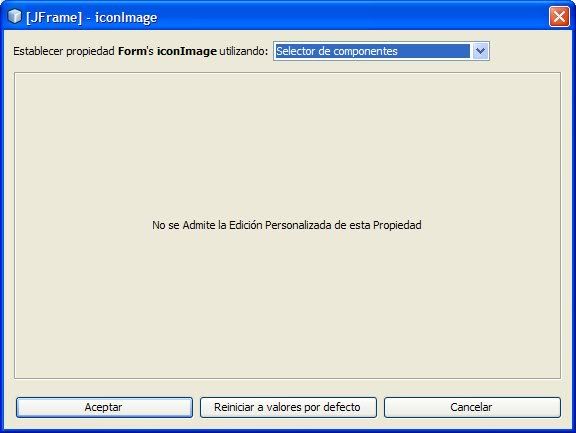
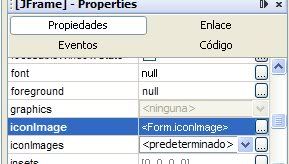
4)En la vista de diseño del JFrame, lo seleccionamos y vamos sus propiedades, buscamos la propiedad "iconImagen" y hacemos clic en el botón de puntos suspensivos. Se mostrará una ventana de diálogo como esta:


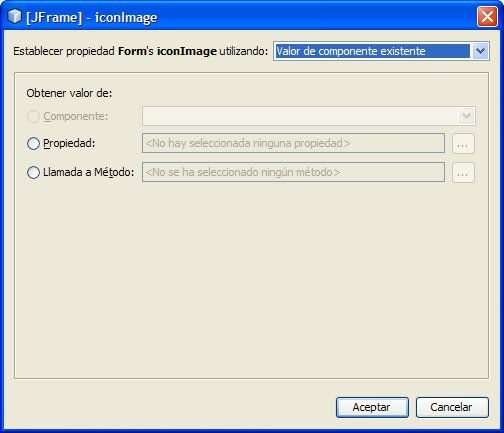
De la lista desplegable, seleccionamos "Valor de componente existente". Esto hará que cambie la ventana a la siguiente forma:


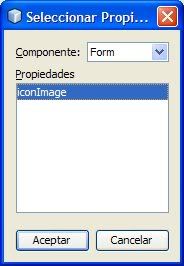
Seleccionamos la opción "Propiedad" y hacemos clic en el botón de puntos suspendidos. Aparecerá una ventana de diálogo más pequeña, y seleccionamos la propiedad "iconImage" que aparece ahí.
 

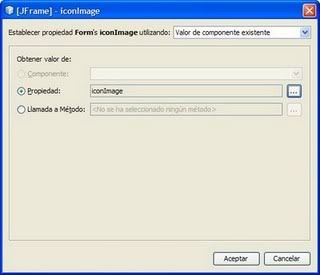
le damos Clic en Aceptar, y se verá así:


y nuevamente clic en "Aceptar" para cerrar la ventana de selección de imagen.
Ahora, veremos que las propiedades del JFrame ya tiene un nuevo valor


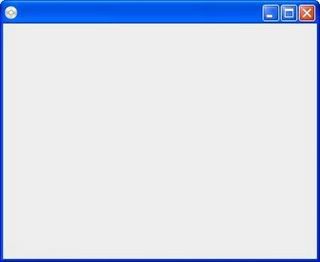
Ejecutamos la aplicación con el JFrame y veremos nuestro JFrame con un ícono diferente.
Share:

Validador de RUT

Es una forma sencilla de obtener un rut completo a partir de los dígitos anteriores.
De facil uso ya que el método que obtiene el dígito de control es muy sencillo prácticamente de niños

package validador.rut;
/*
 * v.java
 *
 * Creado en 09/08/2011, 05:58:13 PM
 *
 * Aplicacion creada por jonathan-palomino.blogspot.com.
 *
 */

/**
 *
 * @author Jonathan palomino 
 */
class v {
static String RUT="12345678";
    public static void main(String args[]) {
        int M = 0, S = 1;
        int T = Integer.parseInt(RUT);
        for (; T != 0; T /= 10) {
            S = (S + T % 10 * (9 - M++ % 6)) % 11;
        }
        System.out.println(RUT+"-"+(char) (S != 0 ? S + 47 : 75));
    }
}
Share:

Usar Zoom en imagenes

Alguna ves quisiste darle zoom a una imagen o quisiste agregar esa función a un proyecto tuyo pues ahora te traigo la solución.
Se trata de una clase o librería x decirlo asi que te dará esa habilidad.

package Zoom;

/**
 *
 * @author JONATHAN
 */
import java.awt.Graphics;
import java.awt.Graphics2D;
import java.awt.Image;
import java.awt.RenderingHints;
import java.awt.image.BufferedImage;
import javax.swing.JPanel;

public class Zoom extends JPanel {

    private Image FOTO_ORIGINAL;
    private Image FOTO_tmp;
    private BufferedImage Imagen_en_memoria;
    private Graphics2D g2D;
    private boolean con_foto = false;   

    private int valEscalaX=0;
    private int valEscalaY=0;

    /* al crear el objeto se crea con una imagen pasada como parametro*/
    public Zoom(BufferedImage f){
        this.FOTO_ORIGINAL = f;
        this.FOTO_tmp = f;
        this.setSize(f.getWidth(),f.getHeight());
        this.setVisible(true);
        this.con_foto=true;
    }

    @Override
    protected void paintComponent(Graphics g) {
      Graphics2D g2 = (Graphics2D)g;
      if(this.con_foto){
        Imagen_en_memoria = new BufferedImage(this.getWidth(), this.getHeight(), BufferedImage.TYPE_INT_RGB);
        g2D = Imagen_en_memoria.createGraphics();
        g2D.setRenderingHint(RenderingHints.KEY_ANTIALIASING, RenderingHints.VALUE_ANTIALIAS_ON);
        //se añade la foto
        g2D.drawImage(FOTO_tmp,0, 0, FOTO_tmp.getWidth(this), FOTO_tmp.getHeight(this), this);
        g2.drawImage(Imagen_en_memoria, 0, 0, this);
      }
    }

    public void Aumentar(int Valor_Zoom){
        //se calcula el incremento
        valEscalaX =  (int) (FOTO_tmp.getWidth(this) * escala(Valor_Zoom) );
        valEscalaY =  (int) (FOTO_tmp.getHeight(this) * escala(Valor_Zoom) );
        //se escala la imagen sumado el nuevo incremento
        this.FOTO_tmp = FOTO_tmp.getScaledInstance((int) (FOTO_tmp.getWidth(this) + valEscalaX), (int) (FOTO_tmp.getHeight(this) + valEscalaY), Image.SCALE_AREA_AVERAGING);
        resize();
    }

    public void Disminuir(int Valor_Zoom){
        valEscalaX =  (int) (FOTO_tmp.getWidth(this) * escala(Valor_Zoom) );
        valEscalaY =  (int) (FOTO_tmp.getHeight(this) * escala(Valor_Zoom) );
        this.FOTO_tmp = FOTO_tmp.getScaledInstance((int) (FOTO_tmp.getWidth(this) - valEscalaX), (int) (FOTO_tmp.getHeight(this) - valEscalaY), Image.SCALE_AREA_AVERAGING);
        resize();
     }

    private float escala(int v){
        return  v/100f;
    }

    public void Restaurar(){
        this.FOTO_tmp = this.FOTO_ORIGINAL;
        resize();
    }

    private void resize(){
        this.setSize(FOTO_tmp.getWidth(this),FOTO_tmp.getHeight(this));
    }
}
Ahora los métodos para operar esta clase son los siguientes en este caso con este abrilos la imagen en un jpanel que estará dentro de un jscrollpane.
El motivo es para que la imagen al dimensionarse en el jpanel no dimensione tambien el jframe que se usara para visualizar el contenido

private void Abrir_Imagen() {
        fileChooser = new JFileChooser();
        fileChooser.setFileFilter(filter);
        fileChooser.setCurrentDirectory(Directorio);
        int result = fileChooser.showOpenDialog(null);
        if (result == JFileChooser.APPROVE_OPTION) {
            try {
                BufferedImage imagen = ImageIO.read(fileChooser.getSelectedFile());
                Cambiar(imagen.getWidth(), imagen.getHeight());
                zoom = new Zoom(imagen);
                this.Panel.removeAll();
                this.Panel.add(zoom);
                this.Panel.repaint();
                this.Directorio = fileChooser.getCurrentDirectory();
            } catch (IOException ex) {
                System.out.println("error: " + ex);
            }
        }
    }
    private void Cambiar(int alto, int ancho) {
        Panel.setPreferredSize(new Dimension(alto, ancho));
        Panel.setSize(alto, ancho);
    }
Ahora como dije zoom nos permitirá aumentar como disminuir entonces se necesitan estos métodos también.

zoom.Aumentar(50);
zoom.Disminuir(50);
zoom.Restaurar();
Donde 50 en ambos casos es el valor a aumentar o disminuir con respecto a su imagen y bueno restaurar es para regresar a las dimensiones anteriores u originales.
Share:

Coneccion SQL SERVER Y PHP 5.3.x con Netbeans


Hola aun no creo esta entrada pero tengo un ejemplo de como conectar sql server 2008 con php5 fue realizado por mi autoria para un trabajo de la universidad con base de datos espero comentarios acerca de su creación.

Share:

Visitantes

Flag Counter

Popular Posts

Etiquetas

Recent Posts